The NextGenAiAssistant – Bulk Content Generator module allows you to create a wide range of content for your products, including descriptions, meta tags, translations, and more. This guide will walk you through the steps for generating product content using the AI Assistant, using a product description as an example.
1. Access the Product Edit Page
- In your PrestaShop admin panel, go to Catalog > Products.
- Select the product you want to edit and click to open its details.
2. Navigate to the AI Assistant Tab
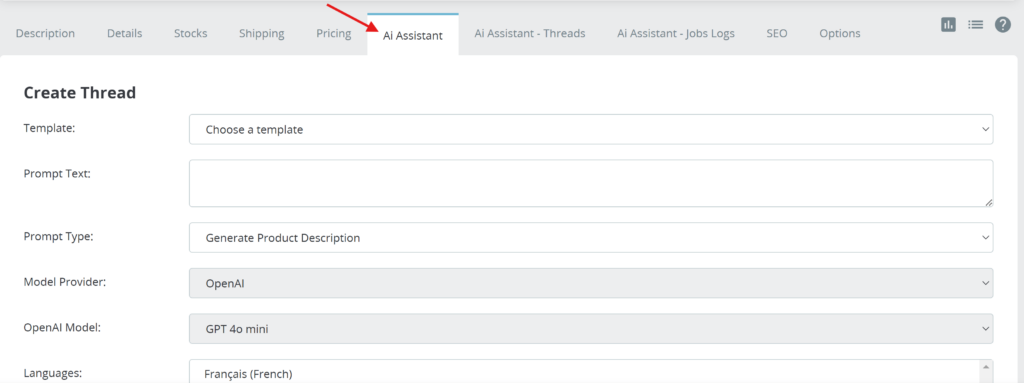
- Once in the product editing view, select the AI Assistant tab. This tab provides access to all AI-powered content generation tools available for the selected product.

3. Fill Out the Create Thread Form
To generate content (in this example, a product description), complete the fields in the Create Thread form as follows:
- Template: Choose a predefined prompt template if you have one. Templates provide a consistent structure for content requests, helping streamline the generation process.
- Prompt Text: Use this optional field to add additional instructions to refine the AI’s output. For example, you could specify a desired character count, add keywords, or request a certain tone. This is added on top of the main prompt defined by the selected Prompt Type.
- Prompt Type: Select the type of content you want to generate. For this example, choose Generate Product Description to instruct the AI to create a detailed description based on the product data and settings provided.
- Prompt Model: Choose between GPT-4o mini and GPT-4o.
- GPT-4o mini – a more budget-friendly option that may be sufficient for generating basic content. However, its performance can vary depending on the complexity of the task.
- GPT-4o – recommended especially for translations, particularly for longer or more nuanced texts. It delivers significantly more accurate and detailed results, making it the preferred choice for high-quality language tasks.
- Languages: Select the language in which the AI will generate the content, ensuring it aligns with your store’s localization requirements.
- Shops: For multistore setups, select the specific store(s) to which this content will apply.
- Additional Parameters:
- Autosave: When enabled, the generated content will be saved directly to the product without requiring manual review or approval.
- Backup: Select this option to create a backup of the current product content before applying the new AI-generated content.
- Exclude Completed Records: When enabled, previously processed records within the selected prompt type will be excluded from the generation process, preventing duplicate processing.
- Exclude Date Start: Defines the start date from which processed records should be excluded. If left empty, no start date restriction is applied.
- Exclude Date End: Defines the end date for excluding processed records. If left empty, no end date restriction is applied.
- Verify Translated Data Before Saving: When enabled, the translated data will be validated before being saved. This helps catch common issues like unclosed HTML tags, broken syntax, or inappropriate content. Recommended for production environments.
- Try To Correct If Translated Data Verification Failed: When enabled, the module will attempt to automatically fix detected issues in translated content before saving. Corrections may include closing tags, removing invalid characters, or grammar adjustments. This option only works if “Verify Translated Data Before Saving” is also enabled.
📘 For more details on how translation verification and correction works, see the guide: Verification and Correction of Translations Guide
⚠️ Note: Enabling translation verification and correction features may result in additional credit consumption depending on the complexity and size of the content.
- Temperature: Adjust the AI’s creativity level. Higher values (up to 2.0) produce more creative outputs, while lower values (closer to 0) result in more consistent, straightforward responses.
- Upload Files: You can upload additional .txt or .pdf files to provide the AI with extra context. For example:
- Product Specifications: Include detailed technical information or specifications to help the AI produce an accurate description.
- SEO Requirements: Add guidelines on SEO keywords, preferred tone, or formatting instructions to tailor the content to your marketing needs.
4. Start the Content Generation Process
- Click Create And Run to initiate the thread. This sends your prompt and settings to the AI model, beginning the content generation process. The new content, such as a product description in this example, will be available for review in the thread interface.
- After initiating the content generation process by creating a thread, the module begins processing the request in the background. This is handled through cron jobs that execute specific scripts to manage the communication with the AI model. For more details on setting up these background scripts, refer to the Cron Job Installation Guide.
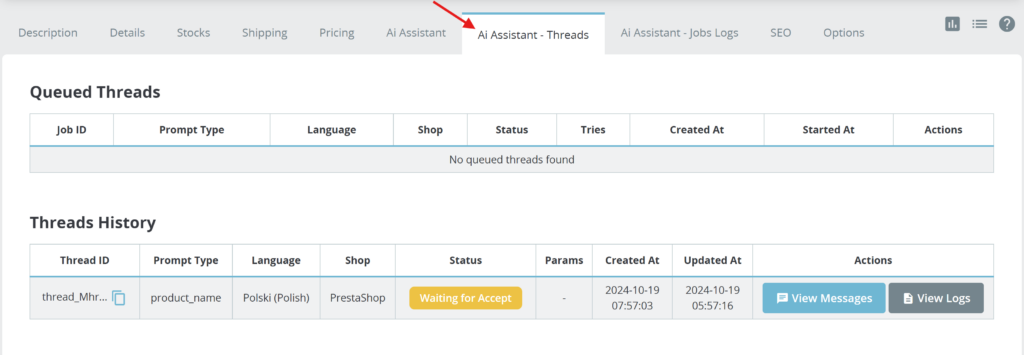
5. Monitoring the Thread in the AI Assistant – Threads Tab
- Once the cron jobs process the request, the newly created thread will appear in the AI Assistant – Threads tab. The processing time depends on your cron job frequency and the current workload of the module, so it may take a few minutes for the content to be generated and displayed.

6. Managing the Generated Content
When the thread becomes available, you have several options to manage the generated content, especially if Autosave was set to Off during thread creation:
- Continue the Thread: You can choose to continue the conversation with the AI by adding new prompts. This allows you to refine or adjust the generated content further if the initial output requires modification or elaboration.
- Create a Backup: Before finalizing any changes, you can create a backup of the current product data. This creates a restore point, allowing you to revert to the original data if needed. This is particularly useful if you want to save different versions of the generated content before making a final decision.
- Accept the Generated Content: Once you’re satisfied with the AI-generated content, you can accept it, which will save the new content to the product database. This action finalizes the content and makes it live on the product page.
For a detailed guide on managing threads, including options for continuing, backing up, and accepting content, refer to the Thread Management Guide.
By following these steps, you can efficiently generate, review, and manage high-quality AI-generated content for your products, using the AI Assistant’s flexible tools to achieve your desired results.